
Interesting Photoshop Technique: Multi-Layer High Pass Filtering
I got the inspiration for this technique from seeing some of Tim Tadder’s work and then just playing around in photoshop with the general idea and adding my own changes and modifications. However Mr. Tadder is not the only person who is doing this technique. High pass filtering is actually a new trend in photography and many photographers have their own version or way of doing it. This technique is interesting because it makes the photo pop and look slightly surreal. It doesn’t take too much to do a simple high pass manipulation, but if you are going to take the technique and make it your own then it could take anywhere from 30 minutes to an hour to manipulate one photo.
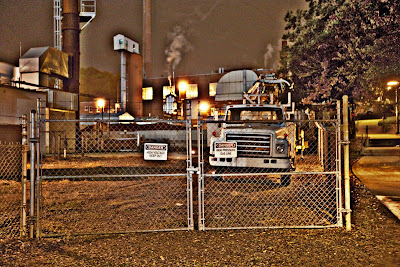
For this paper I took a photo of the factory on campus located between the stadium and Holmes hall (facing the west side of the factory). This is the original photo:
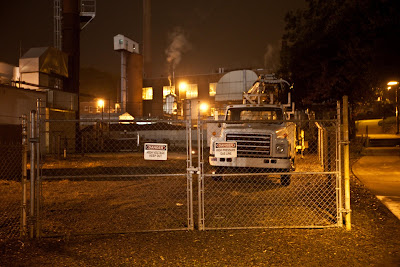
[Started as a .CR2 (Canon RAW file) taken on a 5D MkII with a 16-35mm @ 35mm, 2000 ISO, f/2.8, and 1/13th of a sec.]
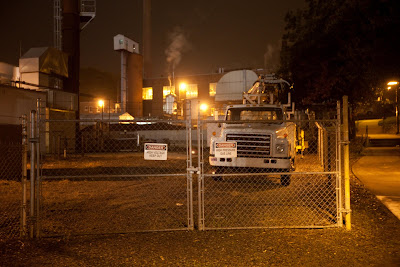
From there (a RAW file) I took the file into Adobe Lightroom 2. The pre-sets for the Canon RAW files take the Temp to 3400, Tint to -4, Brightness to +50, and Contrast to +25. I did a few adjustments to the saturation and luminance (Saturation: Red -38, Orange +11, Yellow -20, Blue +36, Purple +100, and then -18 in the Yellow luminance slider) and moved the clarity slider to +100. This doesn’t make that much of a difference at just a glance but the post-Lightroom 2 photo is slightly softer around the lamp lights. (It is easier to see when the pictures are at a higher resolution.)
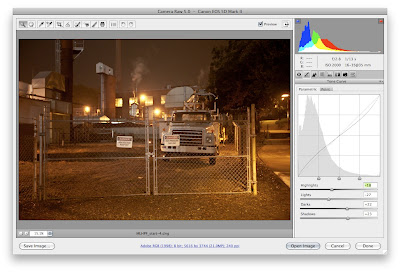
From there I took the photo into Adobe’s Photoshop CS4 as a .DNG file. I adjusted the tone curve in the Camera Raw 5.0 window that pops up when you open a RAW file in CS4. I turned the highlights down 18, the lights down 27, the darks up 22, and the shadows up 23 points.
Then once the photo was opened I duplicated the layer so that there were two unaltered layers of the photo. What gives the multi-layered high pass filtering technique its look is the fact that there are multiple layers stacked on top of each other with differing effects on each. There are three basic layers to the high pass filtering technique that I use. The bottom layer is a copy of the original photo with a few adjustments; the middle layer which is a copy of the original photo unaltered (or in this case with just the Lightroom adjustments) and then the top layer which is a copy of the bottom layer with the High Pass filter ran on it. To start the process take the bottom layer and edit the shadows and highlights. This bottom layer will serve as the base for the photo. For it to serve this purpose it needs to be edited so that the shadows are very bright. To do this, go to Image > Adjustments > Shadows/Highlights and set the shadows somewhere between 70% and 90%. For this particular photo I set the shadows at 80%. I also went into the advanced options and set things up like this:

Once I did that I took the bottom layer and duplicated it (so that there were three layers then) and put this newest layer on top. This top layer is the one that I ran the high pass filter on. The filter can be found under Filters > Other > High Pass. It is generally recommended that the radius for this be set at 75 pixels. (Sometimes I go more or less, it depends on the overall look/tone of the photo.) Because I wanted the photo to be several different photos layered on top of each other I decided at this point that the middle layer was actually not something that I wanted (as having a middle layer that is unaltered just serves to make the photo darker and this was a night scene it was not something that I wanted) so I deleted it. I then took the top layer and applied the following adjustments in the Layer Styles pallet:

For some photos the desired affect that you want will need more of the High Pass layers, and possibly a different Opacity value. There is no rule that you have to follow to achieve this affect for every photo; each one needs a different set of layers/opacity. For this particular photo I used 6 High Pass layers (I duplicated the top layer 5 times, so that there were 6 of them) until it was like I wanted it to be. Then, because it was still a little too dark for me, I adjusted the Opacity of the bottom layer down to 29%.
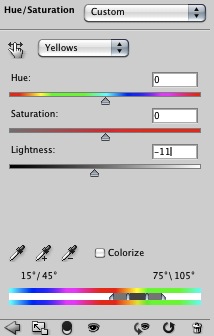
The photo was almost how I wanted it. It just was a little too yellow in the bottom right hand corner. To fix this I applied a few more effects to the photo: in the Hue/Saturation Pallet (under the Adjustments/Masks Pallet) moved the Yellows “Lightness” slider to -11 and under the curves pallet I changed the Output to 23 and Input to 21. I also applied an Underwater Filter (Density of 9%) to the photo for the final look.


No comments:
Post a Comment